DSSD Primer
Description
Silicon strip detectors have been used behind the focal plane of the FMA in a variety of applications. The highly segmented dssd's for implantation/decay studies have been used the most. Fusion cross section measurements also benefit from the segmentation since it allows you to measure the detection efficiency after the focal plane. It is impossible to completely describe all the intricacies of the strip detectors used behind the focal plane of the FMA, but this document should answer some basic questions. To know more you should talk to Cary Davids.
All Shapes and Sizes
- 48x48: the most popular to-date for the proton decay measurements,
300 um wide strips, 60um thick, 1.5cm x 1.5 cm area, ~24 keV resolution @ for
6.5 MeV internal decays, applied V=30 Volts, leakage current=0.2-0.6 uA @ -20
deg C. Click here to see it.
- 16x16: used mostly for fusion cross-section and some low-rate, large
recoil-cone alpha decay measurements, 3mm wide strips, 300 um thick, 5cm x 5cm area, ?? resolution, applied V = 30 Volts, leakage current = 2 uA @ -20 deg C (can be as good as 0.9 uA @ 60 Volts @ -20 deg C).
- 40x40: used for decay measurements with large recoil cones and low rates, 1 mm wide strips, 60 um thick, 4 cm x 4 cm area, ~34 keV resolution @ ?? MeV internal decays, applied V = 30 Volts, leakage current = 2.2 uA @ -20 deg C.
- Quad: this is a large-area single-sided detector with 4 quadrants. It is used when segmentation is not required, but beam rejection vis PPAC-Si TOF measurements is desired.
- Silicon Box: this is a 4-element array of 7-strip silicon detectors
which is mounted in front of the DSSD. It is designed to detect decays which
escape from the DSSD.
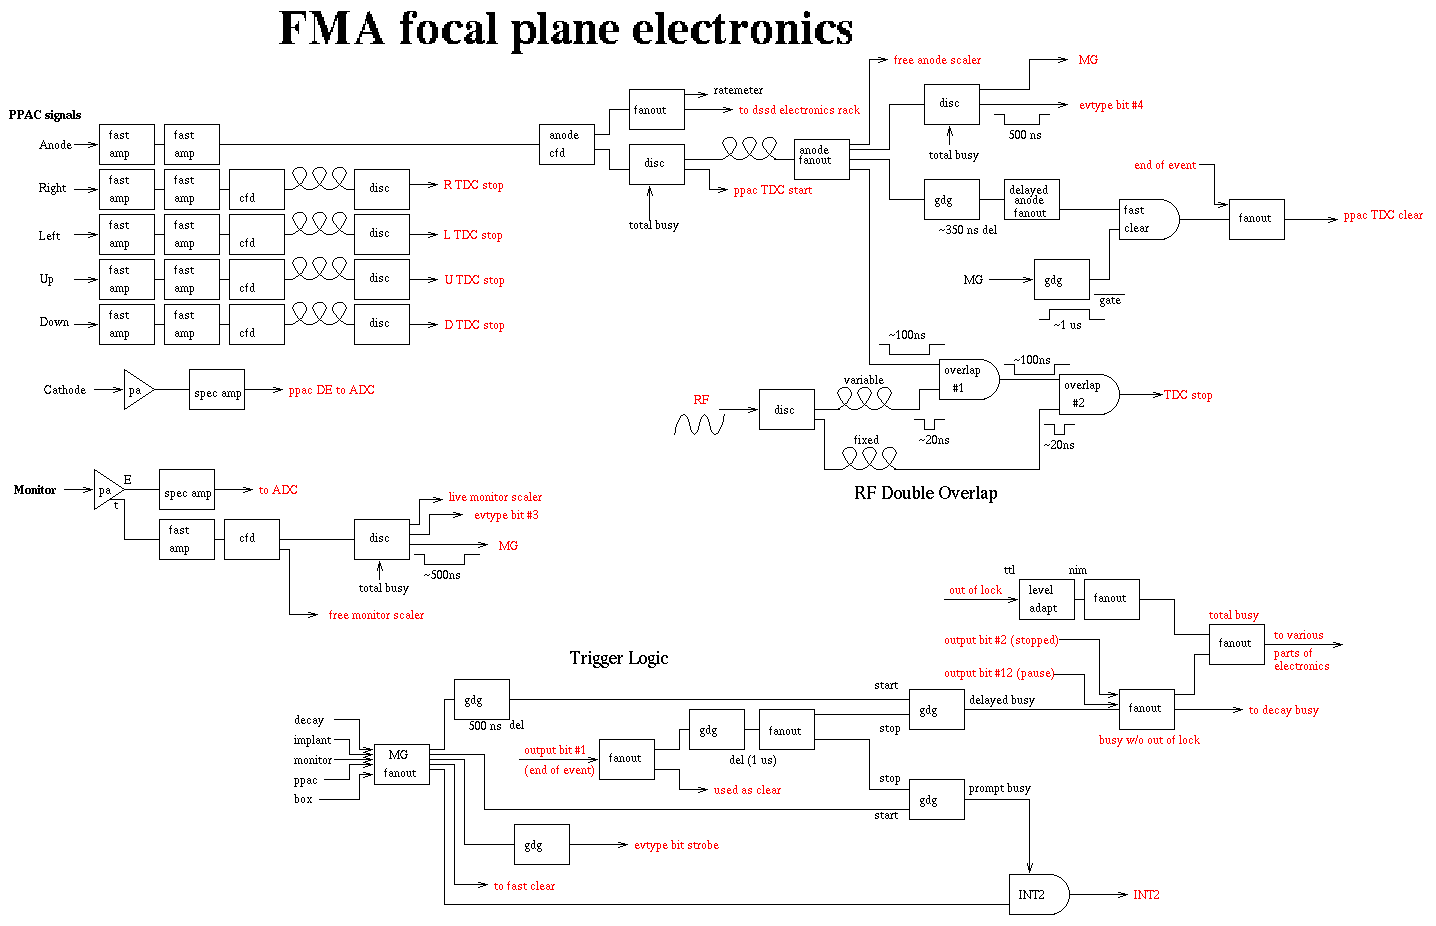
Electronics
The DSSD detectors have a dedicated set of electronics which includes hybrid preamplifiers and amplifiers/discriminators built by Rutherford-Appelton Labs in England. There are 2 sets of amps, one has full-scale gain of 200 MeV and is used to record implantation events in a set of Phillips 16-channel peak-sensing ADC's. The other set has full-scale gain of 20 MeV and is used to record decay events in a set of Silena 8-channel peak-sensing ADC's.
Calibration
The amplfiers do not have adjustable gain, but are within 10% of each
other. The gain-matching is done in software. A Pu/Cm alpha source in
front of the dssd provides a calibration for external alpha
particles. A reaction with known proton and alpha emitters is also
used on occasion for a more accurate internal calibraiton. See the
section below on performing an on-line
calibration with the Pu/Cm source.
Images

Installation
Removal of Other Detectors Behind Focal Plane
Depending on what is behind the PPAC, varying amounts of removal and installation are required. If the ion chamber is there, then it and any spools must be removed. If the flange which has the gate valve is already in place, then there is much less lifting to do.
Preparation of PPAC
- replace rear window if it was removed
- remove plate above ppac to provide pumping around ppac
Preparation of DSSD Chamber
If it is already mounted on the flange/gate valve assembly, the crane must be
used to lift it all in a safe and controlled manner. Use 2 long slings, one on
each side of the gate valve. The gate valve points up, but is not exactly
vertical. Insert a brass pin in the top bolt hole on the back of the PPAC
housing. Slide the flange/valve assembly onto the pin. Insert the rest of the
bolts. Remove to remove the pin before tightening bolts too much in case it is
stuck. Tighten all the bolts while pushing up on the big flange to center
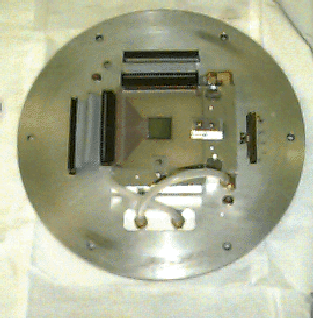
it. When you are done, it looks like this.
Preparation of DSSD Electronics
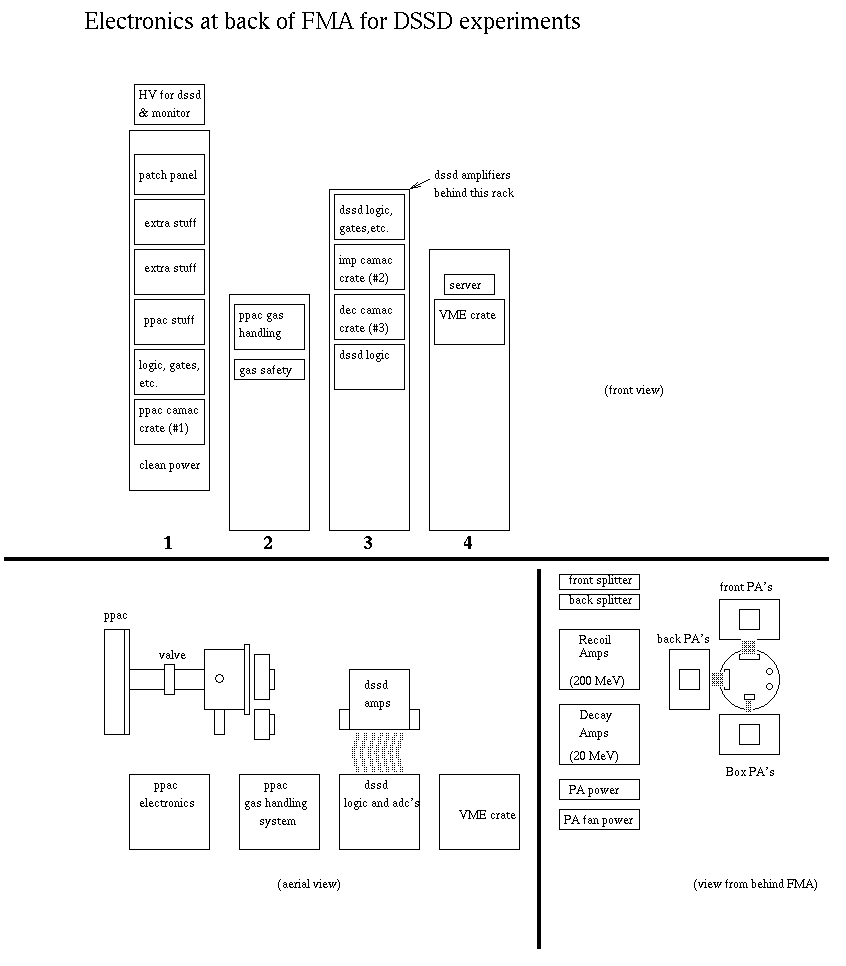
The two racks (amplifiers and CAMAC crates/NIM bins) are usually bolted together
so they can be rolled easily without damaging the cables which go between
them. They should sit just to the right of the PPAC gas-handling system. The VME
crate rack for the data acquisition system sits to the right of everything
else. Roll the racks into place. Mount the preamps on the back flange of the
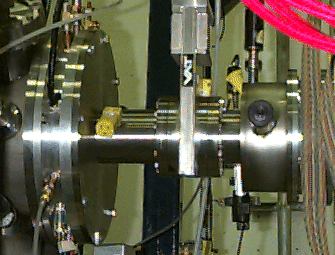
DSSD chamber like this.
Making Connections
- Connect the cooler hoses after making sure the connectors on the back flange are not loose.
- Connect detector signal feedthrough to preamps
- Bolt cover over these short cables if you have one
- Plug in gate valve air hose, valve position indicator, solenoid power, thermocouple gauge
- Connect cables on the DSSD chamber
 Crude peak-finding routine for one 2d histogram which contains the
energy spectrum for each strip on one face. There are up to 5 such
spectra to deal with: ERF (1k), ERB (1k), EDF (2k), EDB (2k), EBOX
(2k). To calibrate them collect a spectrum with ICAL=0 and no gates
so any previous gain corrections are turned off. Once you have a high
statistics spectrum, you can run the routine which computes the gains
and offsets. Then apply them, turn ICAL on, reapply the gates, zap,
collect again and see if they are gain-matched.
Crude peak-finding routine for one 2d histogram which contains the
energy spectrum for each strip on one face. There are up to 5 such
spectra to deal with: ERF (1k), ERB (1k), EDF (2k), EDB (2k), EBOX
(2k). To calibrate them collect a spectrum with ICAL=0 and no gates
so any previous gain corrections are turned off. Once you have a high
statistics spectrum, you can run the routine which computes the gains
and offsets. Then apply them, turn ICAL on, reapply the gates, zap,
collect again and see if they are gain-matched.
OUTLINE:          $FIX ICAL 0 (for 1st pass only)
                  $G2H/COND=(ONED,EDIFFD,DEVETO)/DEL EDF (for 1st pass)
                  $G2H/COND=(ONED,EDIFFD,DEVETO)/DEL EDB (for 1st pass)
                  $G2H/COND=(ONER,EDIFFR)/DEL ERF (for 1st pass)
                  $G2H/COND=(ONER,EDIFFR)/DEL ERB (for 1st pass)
                  $ZAP/2D EDF,EDB,ERF,ERB
                  $ACQ
                  $STP
                  $UH DSSDFIT EDF/2D  (answer the questions)
                  300,600,9
                  48
                  200
                  df
                  5.018,5.659
                  2
                  1
                  $@DF_FLT  (loads the gains)
                  $@DF_FIX  (loads the offsets)
                  $UH DSSDFIT EDB/2D
                  300,600,9
                  48
                  200
                  db
                  5.018,5.659
                  2
                  1
                  $@DB_FLT
                  $@DB_FIX
                  -to skip recoil part, go to "$FIX ICAL 1" step.
                  -plug the pulser in to gain match the recoil electronics.
                  $FIX PULSER 1  (takes into account that all chan fire)
                  $ACQ
                  -collect a spectrum which puts the pulser peak at half of
                  fullscale (512 on 1024 is roughly 100 MeV). Flip
                  a 2x attenuator switch on and collect some more. This will
                  be roughly 50 MeV (ch 256). Remember that the 2D spectrum
                  is used for matching and it has only 1/48 as many counts
                  in each peak as the 1D spectrum so count for a while.
                  $STP
                  $D1 ERF (or ERB)
                  -use SUM to find the centroid of each peak . It will be a
                  mess since it contains 48 unmatched strips. But taking
                  the centroid of this blob to compute the "energy" being
                  simulated by the pulser allows you to make the smallest
                  correction overall.
                  -compute the "energy" of the 2 peaks assuming that 200 MeV
                  is fullscale. On 1024, Epeak=CHpeak*200/2048.
                  $UH DSSDFIT ERF/2D
                  -for energies enter the two values computed above.
                  $@RF_FLT
                  $@RF_FIX
                  $UH DSSDFIT ERB/2D
                  $@RB_FLT
                  $@RB_FIX

                  $@FIX ICAL 1 (turns on gain matching)
                  $G2H/COND=(ONED,EDIFFD,DEVETO) EDF (for 1st pass)
                  $G2H/COND=(ONED,EDIFFD,DEVETO) EDB (for 1st pass)
                  $G2H/COND=(ONER,EDIFFR) ERF (for 1st pass)
                  $G2H/COND=(ONER,EDIFFR) ERB (for 1st pass)
                  $ZAP/2D EDF,EDB,ERF,ERB
                  $ACQ
                  $STP
                  look at recoil pulser spectrum
                  $FIX PULSER 0
                  unplug pulser to check decay stuff
                  $ACQ
                  $STP
                  look at gain matching and decide if it is good enough
                  You can do a second iteration by answering with a 2
                  when the program asks you which iteration.
NOTES on the answers to some of the questions for DSSDFIT:
- the channel range just has to include both peaks in all strips
- the window size should be comparable to or slightly greater than
the FWHM of the entire doublet. If you make it too large, the program
will not find a sharp maximum in the number of counts as it scans
across the spectrum. In addition, the window size should be the same
for the front and back (i.e. EDF, EDB). Otherwise, the program will
find different centroids and hence different gains and/or offsets.
- if you have a 16 strip detector, then gain-match only 16
strips. When you apply these gains/offsets you may get some warning
about daphne not getting enough fix/flt values. Don't worry.
- the scale factor is to convert back from keV to channels. Since
the decay gain is higher, it has a bigger multiplicative factor.
- the name is just 2 letters and is used to name the files written.
- the energies listed below (5.018, 5.659) are not the
true energies of the alpha particles coming out of the source. They
are the centroids of the two doublets based on an internal dssd
calibration and corrected for the recoil effect. This was done with
the 48x48 DSSD and may not be correct for other DSSD's due to
differences in dead layer thickness.
- the map gain is how much the raw data is compressed by daphne
before histogramming.
- you can iterate the calibration. The first time, turn
off the calibration and remove all the gates. If you want to run the
program on an already calibrated spectrum, leave ical=1 and the
gates applied. Answer with a 2 for the iteration.
- Three files are written each time you run the program. For EDF,
you get df_gain.dat (text file with gain and offset for each strip),
df_flt.com (com file to tell daphne the new gains), and df_fix.com
(com file to tell daphne the new offsets).
Last Updated: June 3, 1996 (D.J. Blumenthal, [email protected])